Welcome to customize all kinds of clothing
How to tie the drawstring of a hoodie
Of all the small, mundane tasks in daily life, few are as simultaneously simple and perplexing as tying the drawstring of a hoodie. It’s a skill many of us perform on autopilot, yet for others, it’s a source of constant frustration, resulting in a lopsided hood, a knot that refuses to come undone, or a string that perpetually retreats into its casing. Mastering this small art is about more than just utility; it’s about achieving comfort, style, and a small, satisfying victory over everyday chaos. This guide will walk you through the fundamentals, troubleshoot common problems, and even explore a few stylistic flourishes.
The Foundation: The Standard Bow Knot
This is the classic, reliable method for securing your hoodie. It’s secure yet easy to untie, making it the go-to for most people.
- The Even Start: Begin by pulling both ends of the drawstring downward so the hood sits comfortably around your face. Ensure the ends are of equal length. An uneven start is the most common reason for a lopsided, messy finish.
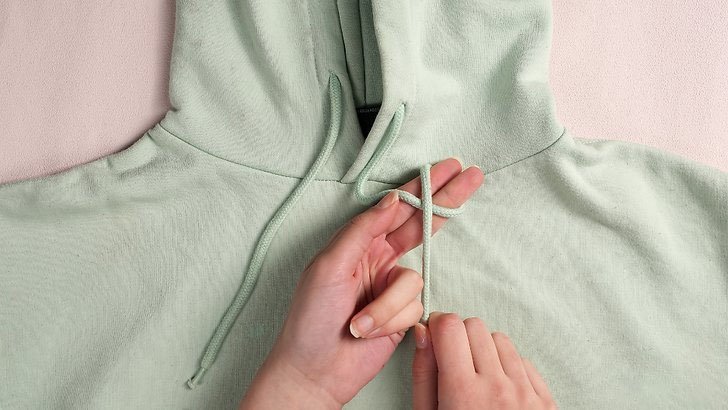
- The Initial Cross: Take the right string and cross it over the left one, forming an “X” about halfway down the strings. Hold this cross point firmly between your left thumb and forefinger.
- The First Loop: Now, take the string that is now on the right (which was originally the left), and loop it up and over the cross point, then tuck it down through the emerging loop from behind. You have now created the first half of the knot—a simple overhand knot. Pull it snug, but not tight. This is your foundation.
- Creating the Bunny Ears: Instead of pulling the strings tight into a single knot, you will now form two loops, or “bunny ears.” With your left hand, pinch the left string about halfway down to form a loop. Do the same with the right string in your right hand.
- Tying the Ears Together: Cross the right loop over the left loop, just as you did with the single strings. Then, tuck the right loop behind the left and pull it through the newly formed opening. Think of it as tying a knot with two loops instead of two straight ends.
- The Final Pull: Grasp both loops and pull them firmly away from each other. The bow should tighten neatly. Adjust the loops and the trailing ends to your desired size and tightness. A well-tied bow will be symmetrical and sit flat against your chest.
Troubleshooting Common Drawstring Dilemmas
A perfectly tied knot is useless if you’re battling other issues. Here’s how to solve the most frequent hoodie hassles.
The Vanishing Drawstring: This is arguably the most irritating problem. One tug, and the string disappears into the hoodie’s casing. Fear not, recovery is straightforward.
- The Safety Pin Method: This is the most effective technique. Attach a safety pin to one end of the lost drawstring. Use your fingers to feel where the string is lodged inside the casing. Pinch the fabric just ahead of the safety pin and start “walking” the pin through the casing by pushing and pulling it gently through the tunnel. It requires a bit of patience, but it will guide the string all the way around the hood and out the other side.
- The Alternative: The Wire Hanger: Straighten a wire coat hanger, leaving the hook intact. Hook the end of the drawstring and carefully feed the hanger through the casing. Once through, you can re-thread the string.
The Immovable Knot: Sometimes, a knot gets pulled so tight it seems permanent.
- Patience, Not Force: Don’t just pull harder. This often tightens it further.
- The “Push and Wiggle” Method: Identify the two main loops of the knot. Try to push them towards each other to loosen the structure. Sometimes, wiggling a fingernail or a thin, blunt object like a pen cap into the knot’s center can create enough space to start working it loose.
- The Lubrication Trick: In extreme cases, applying a tiny bit of lubricant like hand sanitizer or a drop of water can reduce friction enough to work the knot free.
Beyond the Basic: Styling Your Hoodie Knot
Once you’ve mastered the functional, you can explore the fashionable. How you tie your drawstring can be a subtle style statement.
- The Asymmetric Drape: For a laid-back, casual look, simply pull the drawstring so the hood is adjusted, but don’t tie a knot at all. Let the ends hang down at different lengths. This creates an effortless, relaxed vibe.
- The Single Knot: After creating the initial overhand knot, instead of making a bow, simply pull both ends tight. This creates a clean, minimalist look without the bulk of a bow. It’s secure and sleek.
- The Internal Tuck: For the ultimate clean look, adjust the hood to your liking, then tie a standard knot (a single overhand knot works well) and tuck the entire string, ends and all, back into the hoodie’s casing through the grommet. This gives a smooth, knot-free front, perfect for a more streamlined appearance under a jacket.
A Final Pull
Tying your hoodie’s drawstring is a small but meaningful interaction with an everyday object. The simple, symmetrical bow is a testament to order, the rescued vanished string a minor triumph of problem-solving, and the stylistic knot a touch of personal expression. It’s a reminder that even in the simplest acts—crossing one string over another, looping, and pulling—there is potential for both function and flair. So the next time you pick up your favorite hoodie, take a moment to appreciate this small piece of engineering. Pull the strings, tie your knot with intention, and enjoy the perfect, custom-fit comfort you’ve just created for yourself.